Dessert

Nanny's Banana Bread

272C13B3-3F3E-42F1-870A-3B1B04D6B943.JPG

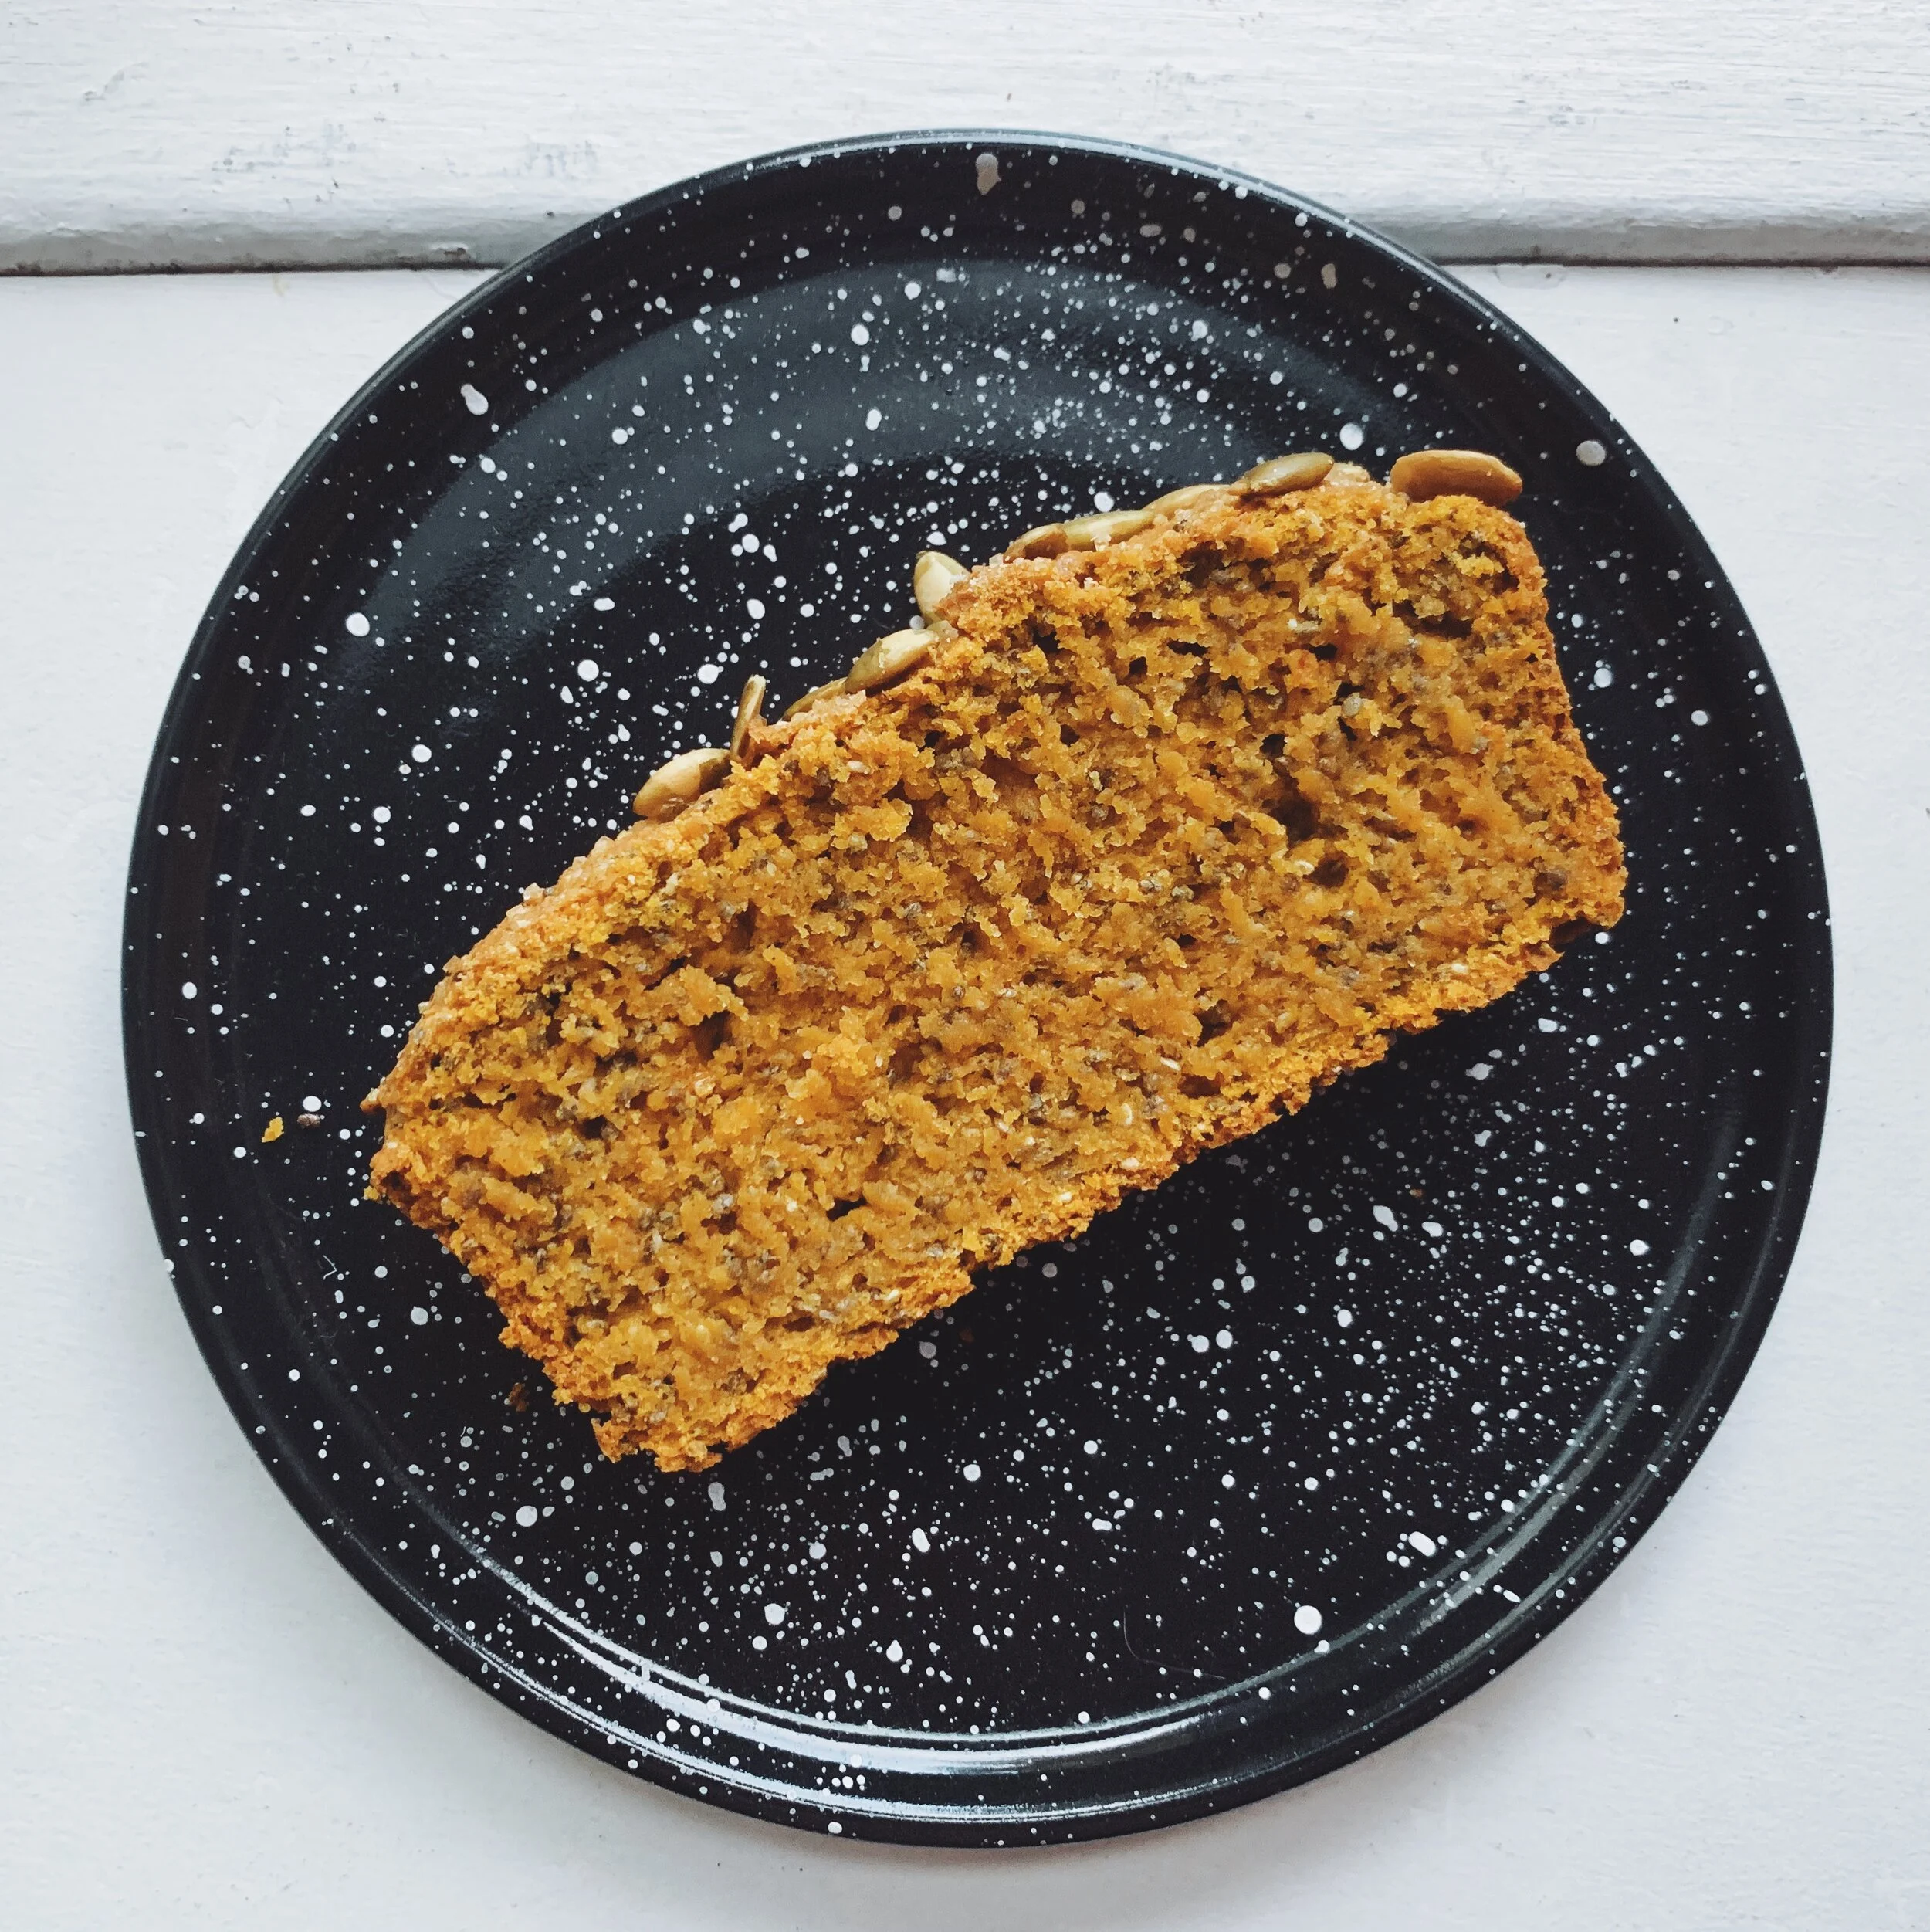
There are a million banana bread recipes on the internet. It’s hard to know which one to follow; which one will give the best result? All I can say is, in my eyes, this is the best banana bread out there because… it’s my Nanny’s recipe. This is the banana bread I ate my whole childhood - dark in colour and rich in flavour. I’ve tweaked it slightly to reduce the sugar and use whole grain flour (optional). But otherwise, it’s pretty much exactly how my darling grandmother made it.

EC291FC6-FD06-4F05-9352-3B3D25CDA082.JPG

Nanny’s Banana Bread

NOTE: This bread will keep on the counter for 2-3 days if you top with a banana slice like pictured. Without the banana on top, 4-5 days. It also freezes very well - recommend slicing and putting parchment paper between each slice. Reheat individual slices at 350F until toasty!

ingredients

4 small or 3 large bananas, very ripe and browned (+ one additional for topping if you’d like)

½ cup unsalted butter, melted

½ cup white sugar

2 eggs

1 cup all-purpose flour

¾ cup whole grain flour (or you can do all AP if you do not have WG)

1 tsp baking soda

1 tsp baking powder

¾ tsp kosher salt

method:

  1. Preheat oven to 350F. Prepare a loaf pan by greasing with butter or cooking spray and lining with a parchment paper “hammock” (parchment paper covers bottom and sides length wise).

  2. In a large bowl, mash your ripened bananas. Add in melted butter, sugar and eggs, mixing until well combined.

  3. In a medium bowl, whisk together dry ingredients.

  4. Pour dry ingredients into the wet ingredient bowl and fold in, being careful to not overmix. No flour should be visible, but clumps are ok!

  5. Pour into your prepared loaf pan. If you have an extra banana, slice in half lengthwise and place on top of the batter.

  6. Bake for 60-75 mins, until deeply browned and a cake tester comes out clean. Allow to cool completely before slicing.

Pumpkin Chia Seed Snacking Bread

6E5A04A7-43E6-4E57-8410-E9DCCB22092D.JPG

This bread was developed out of my love for pumpkin flavoured sweets but with the aspiration of avoiding the sugar crash of traditional baked goods. My mom is a wizard of making homemade muffins and tweaking them to be a bit more wholesome (reducing butter and refined sugars, adding in seeds and nuts). I wouldn’t go as far to say this is a “healthy” bread but it definitely has a bit more oomph to it to keep you going throughout the day, rather than a quick sugar rush. Delicious as a snack or as a sweet treat with tea. 

C56E059E-CA27-48C9-8182-0CAC4CA13849.JPG
2EAB8735-79BE-445E-A8C2-3F26FAEA04ED.JPG

Pumpkin Chia Seed Snacking Bread

15 mins active work, 60 mins baking

Recipe updated September 21, 2020 - changed the baking powder, baking soda and almond flour measurements and increased the oven heat to help the bread rise and create a less dense texture!

Ingredients

1 1/4 cups of pumpkin puree (canned)

⅓ cup maple syrup

1 egg

¼ cup of coconut oil, melted

1 tsp vanilla extract

1 cup all-purpose flour 

½ cup almond flour

⅓ cup chia seeds

¾ tsp baking powder

1 tsp baking soda

1 tsp kosher salt

½ tsp cinnamon

¼ tsp ground nutmeg

Optional topping:

1 tbsp of sugar (preferably raw sugar or turbinado sugar - larger granules)

2 tbsp of pepitas (or other nut/seed - pecans, sliced almonds, sunflower seeds etc)

Method:

  1. Preheat oven to 425F. Prepare a loaf pan with a parchment paper “hammock” - the paper should line the bottom and the long sides.

  2. In a large bowl, whisk together all of the wet ingredients (pumpkin puree, maple syrup, egg, coconut oil, vanilla)

  3. In a medium bowl, combine the dry ingredients and whisk to get rid of the clumps of almond flour (AP flour, almond flour, chia seeds, baking powder, baking soda, salt, cinnamon and nutmeg)

  4. Pour the dry ingredients into the large bowl with the wet ingredients and gently fold in until fully incorporated. You don't want to overmix but you also want to ensure there are no dry patches of flour.

  5. Pour into prepared loaf pan. You made need to spread it around to ensure it is even in the pan.

  6. Sprinkle the top of the batter with your seed of choice, and sugar if desired.

  7. Bake for 5 mins at 425F and then lower the heat to 375F. Bake for 55 mins. The loaf should be fragrant, and a cake tester comes out clean. You shouldn’t feel much resistance when you push the cake tester in and pull it out. If you feel resistance, leave it in for 5-10 more mins.

  8. Cool on a rack for 30-60 mins until fully cooled.

  9. Best served the day of but can be stored on the counter for 2-3 days or in the fridge for up to 4- 5 days. Tastes delicious toasted the next day!


Mocha Almond Cookies (Gluten Free)

545E0B27-7D33-4CC1-96DA-D82F48C38C25.JPG

These cookies are like if a brownie and an almond cookie had a baby. Not too sweet, more cake-y than cookie, they are a quick and easy (+gluten free) dessert. I have a sincere love/hate relationship with baking. The precision of traditional recipes can sometimes be too much for my patience. What if I forgot to leave the butter out and it’s not room temperature? Soften in the microwave for a touch too long and your butter is melted, ruining any chance of a fluffy cream with the sugar. This recipe is designed to be fool proof. Even when I shot these photos I forgot the cocoa powder and had to add it at the end. All was well. That’s my kind of baking!


121BF02A-7A90-40D8-B748-49B6391B42D1.JPG

Mocha Almond Cookies (Gluten Free)

30 mins

Yields: 12-15 cookies


Ingredients:

1 ½ cups almond flour

¼ cup cocoa powder

1 tsp instant coffee

2 tsp baking powder

1 tsp kosher salt

½ cup semi-sweet chocolate chips

¼ cup unsalted butter

¼ cup natural almond butter

1 egg

⅓ cup white sugar

1 tsp vanilla


Method:

  1. Preheat oven to 375F. Prepare a cookie sheet with a silpat mat or parchment paper.

  2. In a small mixing bowl, whisk together the dry ingredients (almond flour, cocoa powder, instant coffee, baking powder, kosher salt). Set aside.

  3. In a microwave safe bowl add the semi-sweet chocolate chips, butter and almond butter.  Microwave on medium-high in 45 second increments (likely only need 2) until the chocolate chips and butter melt.

    • Stir in between to combine - it may look like the chocolate isn’t fully melted but when you stir they may melt into the heat. Stir until smooth. Set aside to cool for 5 mins.

  4. In a large mixing bowl whisk together the egg, sugar and vanilla until combined.

  5. Pour your melted butter/chocolate mixture into the egg mixture, and stir until smooth.

  6. Add your dry ingredients and fold in until everything is well incorporated.

  7. Scoop 1.5 tbsp portions and roll each into a ball. Place onto prepared cookie sheet and press down with three fingers to slightly flatten. Cookies won’t spread much but leave 1 inch in between.

  8. Repeat for 12-15 cookies.

  9. If desired, top cookies with flaky sea salt or a little extra kosher salt.

  10. Bake in preheated oven for 12 minutes.

  11. Allow to cool on the sheet - enjoy!


Ultimate Rice Krispie Squares

2CC210DB-A2A4-4773-8F6B-47196E8A0826.JPG

My mom used to always make Rice Krispie squares for my brother and I, and they were the BEST. I always wondered why my mom’s tasted so much better than any other Rice Krispie squares that other moms made, and I still don’t really know. She probably made them once a week, and in preparing this recipe, her and I reminisced, guessing how many batches of these she sent up to Antigonish (2 hours away from home) while my brother and I were in university. She used to always put semi-sweet chocolate chips in her squares, making them perfect with a big glass of milk.

Back in 2015 I bought Milk Bar by Christina Tosi, and quickly became obsessed with her ability to bring together nostalgia and perfectly seasoned sweets for that ideal sweet and salty bite. Inspired by Tosi’s “Compost Cookie (R)”, I started adding pretzels, potato chips sticks and corn flakes to my squares. The result is a more grown-up flavour but the same familiar taste of my mom’s Rice Krispie Squares. Enjoy!


Ultimate Rice Krispie Squares

15 minutes, 20 minutes to cool

Pro-tip: the first 3 ingredients you can buy at the Bulk Barn or your local bulk store, rather than buying full packages

Ingredients

1 cup salted pretzels sticks

1.5 cups potato chip sticks

2 cups corn flakes

5.5 cups Rice Krispies

½ cup butter, unsalted (if using salted, do not add kosher salt)

1 tsp kosher salt

~55 marshmallows (about one large bag)

1 tsp vanilla extract

¾ cup semi-sweet chocolate chips

1/3 cup Skor toffee bits


Method

  1. Prepare a 11 x 17 pan by greasing generously with butter.

  2. Mix together the first three ingredients (pretzels, potato sticks, corn flakes), crushing with your hands to make them smaller pieces (but not dust). Add in Rice Krispies and stir until uniformly mixed.

  3. In a large bowl, melt the butter in microwave*. Add in the kosher salt.

  4. Add in marshmallows and microwave in 30 second intervals until marshmallows have puffed up / are melty and can be stirred to incorporate into butter. Stir in vanilla extract and continue to stir until smooth. Be ready to move quickly to step 5 otherwise your marshmallow mixture will harden.

  5. Moving quickly, stir in dry ingredient mixture to the marshmallow sauce until fully coated. Add in the chocolate chips and skor bites last to prevent too much melting, folding until uniformly mixed.

  6. Press into the prepared pan (coat your hands with butter so the mixture does not stick to your hands, or use a piece of parchment paper to press down).

  7. Refrigerate until hardened. Store in fridge for up to 5 days.

*If you’re like me and somehow have reached adulthood without a microwave safe mixing bowl, you can also do this on the stove top. Start by melting the butter over medium heat, and then keep a very close eye when you add in the marshmallows. Stir often once the marshmallows are in to prevent sticking - remove from heat once it becomes smooth and uniform, before adding in the vanilla.

Lemon Olive Oil Cake (Gluten Free)

53855797_364391530823034_918869782957129728_n.jpg

Growing up, my mom always preferred lemon desserts. In the true fashion of trying to copy everything my mom liked, I have now developed a strong preference for citrus based desserts. But desserts are always a bit of a downfall for me when I have company over for dinner. I always seem to run out of time.

Enter this 7-ingredient lemon olive oil cake that involves no flour (gluten-free friendly and no flour all over your kitchen!) and no fancy baking equipment. You don’t even need vegetable oil! Just your regular everyday cooking extra virgin olive oil. Don’t have a cake pan? You can do this in a square brownie pan! Don’t have a lemon? Use an orange! The world is your oyster/cake. One bowl, a quick 15 mins in the oven and your dessert is ready.

The result is a thin, crumbly, spongey cake that’s not too sweet but hits the spot after a decadent meal. Also goes well with tea for an afternoon treat.

53001548_614821895610776_5457116559317139456_n.jpg

Lemon Olive Oil Cake

30 minutes total

Ingredients

  • 2 large eggs

  • ½ cup white sugar

  • ¼ cup extra virgin olive oil

  • 1 large lemon zested (yields about 1 tbsp lemon zest)

  • 2 cups almond flour (ground almonds)

  • 1 ½ tsp baking powder

  • ¼ tsp kosher salt

  • ½ lemon, juiced (yields about 2 tablespoons)

 Method

  1. Preheat oven to 350F and prepare a 9” cake pan by oiling the sides/spraying with cooking spray and lining the bottom of the pan with a piece of parchment paper

  2. Tip: trace the bottom of your pan on a piece of parchment paper and cut out the circle to get the perfect piece

  3. Whisk together the eggs, olive oil, sugar and lemon zest in a medium bowl until smooth

  4. Add the almond flour, baking powder and kosher salt on top. Mix together with the wet ingredients using a fork, which helps prevent you from overmixing. Mix until combined.

  5. Add the lemon juice and fold into the mixture.

  6. Pour into the prepared pan.

  7. Bake for 20-25 minutes or until a cake tester comes out clean. The top should be evenly brown.

  8. Let cool completely before serving. Serve with a dusting of icing sugar on top. Or with a big scoop of ice cream.